
Now that Thanksgiving has passed in a waterfall of delicious gravy, we're free to officially dive into some Christmas traditions! For us here at Bob's Red Mill, that means building a gingerbread house. And not just any gingerbread housethe talented team of Food Innovation Chef Sarah House, Consumer Marketing Manager Lindsey Duncan, Marketing Project Coordinator Amber Olson, Graphic Designer Nell, Photographer Julie Garner, and Marketing Content Specialist Elisabeth Allie (that's me!) made like Santa's elves to craft a gingerbread replica of our famed
Whole Grain Store and Restaurant.
[caption id="attachment_1175725" align="alignleft" width="325"]

The Bob's Red Mill Whole Grain Store[/caption]
[caption id="attachment_1175726" align="alignright" width="325"]
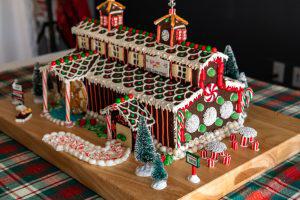
And our gingerbread interpretation![/caption]
Gingerbread houses date back to 1500s Germany, when they were painstakingly decorated with gold leaf. After the publication of the Brothers Grimm's
Hansel and Gretel, they soared in popularity, and of course, you can find simple kits in every grocery store these days. But after our three-day odyssey of confectionary construction, we have some tips for you, whether you're baking your own or decorating a pre-made house. We also have a simple gingerbread house plan you can download and use with the recipe below!
1: Sleep on It (Not Literally)
Rome wasn't built in a day, and it's likely your gingerbread house shouldn't be either. Sarah House, who baked the gingerbread for our project, let the finished pieces sit out for five days so they could become dry and rigid, before we began construction! While five days isn't absolutely necessary, if you have the time, letting your gingerbread sit out overnight can make your house more stable.
The same goes for the construction process: for best results, "glue" the walls together with stiff icing and let sit overnight before attaching the roof and other pieces. Let candy and icing details dry before adding finishing touches like icicles, so you don't accidentally dislodge or smudge your work!
[caption id="attachment_1175734" align="aligncenter" width="770"]

Lindsey Duncan and Amber Olson decorate![/caption]
2: Have a Decorating Game Plan
Before putting together your gingerbread house, check out inspiration online or make a sketch to determine what you want to do. This isn't just for aesthetics: you may realize that it makes sense to ice/decorate the vertical parts of your gingerbread house
before you put it together. For example, Amber traced and then piped the red pinstripes on the walls of our Whole Grain Store before we put the walls together. Not only was it easier to make evenly spaced lines that way, but she saved her wrists a lot of pain!
[caption id="attachment_1175735" align="aligncenter" width="770"]

Crushed candy canes and jelly beans make an adorable path.[/caption]
3: Gather Ye Supplies While Ye May
There's nothing worse than wasting 20 minutes in the middle of a project looking for a piping tip. Believe me, I've been there. As part of your plan above, get out all of the tips, knives and cutting tools, spatulas, food colors and rulers you'll need. You'll thank me later! #ProTip from Sarah: do you have multiple colors of icing that require the same tip? If you don't have couplers, do the double-bag trick: Place your colored icing in separate plastic piping bags and cut off the tips. When you're ready to use a color, grab an extra plastic piping bag, fit it with the tip, and place your bag of icing inside. Swap (and clean out your tip) as needed!
[caption id="attachment_1175736" align="aligncenter" width="770"]

Nell Becker used pretzels to create a water wheel, and designed tiny signs to customize purchased ones.[/caption]
4: Go Nuts (and Candy, and Wafer Cookies, and . . . )
Once your gingerbread house is securely built, it's time to decorate! We used all kinds of candies for ours: nonpareils, gum drops, jelly beans and more. Hit the candy aisle or bulk section and let your imagination run wild! For example, we found white chocolate-covered cookie bits with sprinkles that we cut in half and use as our stone "foundation" for our mill. Nuts, licorice, coconut flakes, and cookies are also wonderful to use: the shutters on our house are cut-up wafer cookies!
[caption id="attachment_1175737" align="aligncenter" width="770"]

Our "Peppermint Patio" emulates the real-life one![/caption]
5: Don't Eat It
Seriously. If you have a hankering for gingerbread, make some gingerbread women out of the scraps! You do not want to gnaw on week-old gingerbread, especially if you've used raw egg whites in the frosting. Just say no!
Are you ready? Let's go!
Download Our Simple Gingerbread House Template Here
Gingerbread House
By Sarah House for Bobs Red Mill Natural Foods
This simple gingerbread recipe is sturdy enough to make a house, and delicious enough to enjoy as cookies: make some gingerbread people out of the scraps!
Thick Gingerbread (for walls)
3 cups Bobs Red Mill Unbleached White All-Purpose Flour
2 tsp ground Cinnamon
1 tsp ground Ginger
tsp ground Cloves
tsp ground Nutmeg
tsp Baking Soda
tsp Baking Powder
tsp Salt
1 cup Vegetable Shortening
1 cup Brown Sugar
2 large Eggs
1 cup Molasses
Thin Gingerbread (for roof and dcor)
3 cups Unbleached White All-Purpose Flour
cup Brown Sugar
2 tsp ground Cinnamon
1 tsp ground Ginger
tsp ground Cloves
tsp ground Nutmeg
tsp Baking Soda
tsp Salt
cup Vegetable Shortening
cup Molasses
12 Tbsp Water
[caption id="attachment_1175738" align="aligncenter" width="770"]

Detail shot! Candies, wafer cookies, and hand-painted gum paste signs add authentic touches.[/caption]
Thick Gingerbread (for walls)
Combine flour, spices, baking powder, baking soda and salt. In a mixing bowl, cream shortening and brown sugar until well mixed. Add egg and molasses and mix well, then add dry ingredients and mix until a smooth dough forms. Remove from bowl, wrap in plastic and chill overnight.
To bake, preheat oven to 350F. Roll dough out between two pieces of parchment paper to -inch thick and the size of a baking sheet. Bake until set yet still soft, about 25 minutes. Let cool then cut shapes to size, using
our Gingerbread House Templateand a sharp knife or pizza cutter. Let sit at room temperature, uncovered, for about 5 days to thoroughly dry out.
Thin Gingerbread (for roof and dcor)
Combine flour, sugar, spices, baking soda and salt. Pulse a few times in a food processor to combine. Add shortening and pulse until the mixture is like coarse sand. Add molasses and process until a smooth dough forms, adjusting with water as needed. Remove from food processor and divide dough in half. Roll dough to -inch thick between pieces of parchment paper then chill overnight.
To bake, preheat oven to 325F. Cut shapes to size from cold dough and carefully transfer to parchment lined baking sheets. Bake until cooked through 1520 minutes. While the shapes are still very warm, trim edges as necessary. Let sit at room temperature, uncovered, for about 5 days to thoroughly dry out.
[caption id="attachment_1175739" align="aligncenter" width="770"]

A view from the top: purchased craft trees provide the perfect finishing touch.[/caption]
Royal Icing
3 oz Egg Whites
46 cups Powdered Sugar
For thin dcor icing, combine egg whites and 4 cups powdered sugar. Whip until well combined. Divide into separate containers and add food coloring as desired.
For thick construction icing, add additional powdered sugar until icing holds its shape when whipped, stiff yet still soft enough to move smoothly through an icing tip.
 Construction
- Do any pre-construction decorating; let dry. Use a cutting board or other sturdy, portable service as a base. Using thick icing, pipe a "foundation" for your house on the board and start placing your walls, then ice the edges and attach additional walls one by one (you may need an extra set of hands to hold everything steady). Once icing sets up, let sit overnight.
- Pipe thick construction icing onto the tops of your walls; attach one roof piece, then use more icing to attach the other roof piece. Hold in place until icing sets up, and let sit for at least an hour before decorating.
- Decorate! Add icing and candy to the walls and roof, as well as to the base to create a path and landscaping, if desired.
[caption id="attachment_1175740" align="aligncenter" width="770"]

From left: Nell Becker, Amber Olson, Bob Moore, Lindsey Duncan, Julie Garner and Elisabeth Allie.[/caption]
We hope you use these tips to create fantastic holiday memories! Do you have any useful gingerbread house tips? Share them in the comments below.

