
Breadmaking and the commercial production of yeast goes all the way back to Ancient Egypt, approximately 300 B.C. During those times, the grains used for bread were hand-ground, using rocks. Think of the coarse, whole grain breads we sometimes see today, and you can get a better picture of the type of loaves that might have been produced in those days. Bread and its production has a long history, and it has changed and evolved a lot over the years. In modern day breadmaking, there are four stages in the process. Stage one is mixing, stage two is proofing and shaping the dough, and stage three is baking. Then, of course, you have the most fun stage, which is eating and storing your culinary masterpieces. 
For the purposes of this post, the process of proofing your dough is the stage we will focus on. So, just what is proofing?
Proofing is often used interchangeably with the word fermentation, although in reality the most common reference is to the final rise a mass of bread dough must make before it is baked, but after it has been shaped into a loaf. Sometimes the term bulk proofing is used to reference the first rise of dough, which can confuse things a bit. This is the rise that occurs before the loaf has been properly shaped. However, the processes and chemical reactions during both the bulk proofing (first rise) and proofing stages (final rise) remain the same, despite the dough being shaped. Shaping the dough only changes its physical form, it doesnt interfere with the magic happening inside the dough.
Sometimes words like proving and even more rarely, words like blooming may be used by bakers to refer to this final rise process. Other terms that refer to this rising of dough include bulk fermentation, first and second rise, and final proof and/or shaped proof. No matter the terminology used, when bakers are speaking this language, they are referring to the same processes and chemical changes that happen when making any yeast bread or baked goods that require leavened dough. Occasionally, the term proofing may also be used to address the process of yeast being dissolved in warm water. This is called proofing yeast. It can also sometimes refer to the process of testing yeast for its viability. This is done by dissolving the yeast in water and feeding it sugar. Viable yeast will eat the sugar and produce a layer of bubbles on the surface of the water. But for the purposes of this post moving forward, the term proofing is referring only to the first rise and final rise of a loaf of bread dough, both before and after the dough has been shaped and readied for the oven.
The process of bulk fermentation, or bulk proofing, is a vital first step in baking bread. At least if you want your bread to look and taste good. It is called bulk proofing or bulk fermentation because the entire batch of dough is being allowed to ferment before it is then divided and shaped into loaves that are ready for baking. The process of fermentation is where the yeast does the most work, infusing the dough with flavor from the ethanol and other byproducts that are produced during the process. The dough also gains structure as the gluten network is inflated by CO2. Some people use active dry yeast, while others use a natural yeast such as sourdough starter made with flour and water over a period of time so that it ferments properly before making bread. When fermenting in room temperatures that are comfortable, the fermentation process takes roughly 1 1/2 to 2 1/2 hours. Note that the warmer the environment, the faster the dough will ferment and begin to rise. However, you have to be cautious not to allow the dough to rise too quickly, because the best flavor is produced only once the yeast has exhausted their oxygen supply. So if you want bread that tastes good, you need to trust the process and have patience. Another problem with allowing the yeast to rise too quickly is that gluten isn't as temperature sensitive as yeast is. So, if the dough is too warm, the gluten structure will not be able to organize itself quickly enough to keep up with the yeast, and then the bubbly internal structure of the dough will end up popping like balloons. This only serves to make your bread look flat and unattractive. So, to recap; if you want bread loaves that look attractive and taste delicious, practice the art of Zen, and allow the bulk rise to happen at a steady pace. Do not rush it. On the flip side, you can also slow down the bulk proofing process, and this can help increase the flavor of your bread and aid in its structural development. However, keep in mind that too much of a good thing is still too much. If you allow your dough to rise and ferment more slowly, at a cooler temperature, it's recommended to not let it go longer than three hours. If you do, you may end up sacrificing flavor instead of enhancing flavor. In general, a bulk proof of around two hours gives your dough a very good balance of texture and taste. Once you set your dough in the location you have designated for the bulk rise, you need to go about your day and just forget about it for a while. Trust us, staring at dough rising is a bit like watching water boil. The more you stare, the longer it seems to take. 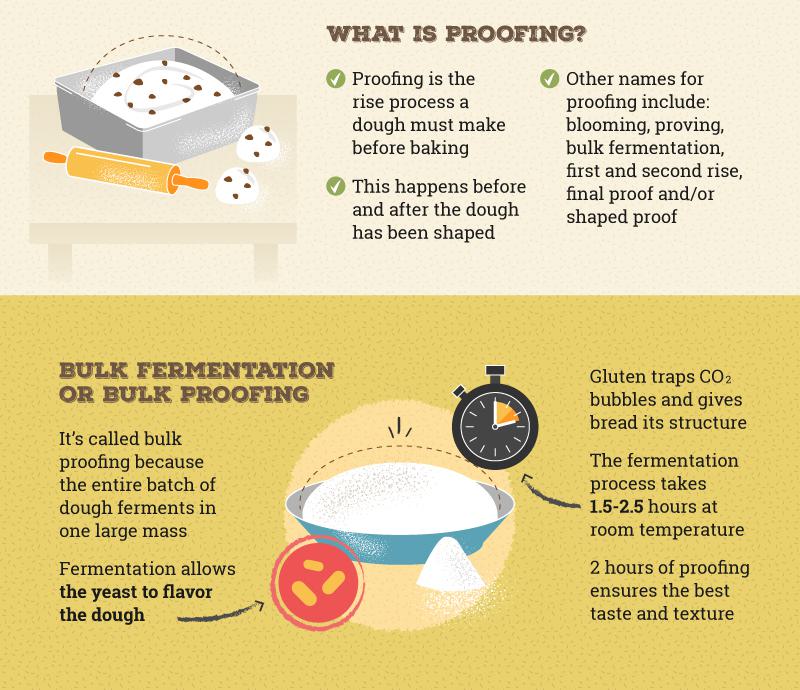
The next step in making a tasty loaf of bread is folding the dough, or in other words kneading your dough.You do this about a half hour into the bulk proofing process, and it is done for a variety of reasons. First, folding the dough helps it to develop its gluten structure. Secondly, it redistributes the yeast and its food, helping the dough to rise properly. Third, it helps to regulate the temperature of the dough by keeping it consistent throughout the mass. All of these processes are what help to keep your dough rising right on schedule. 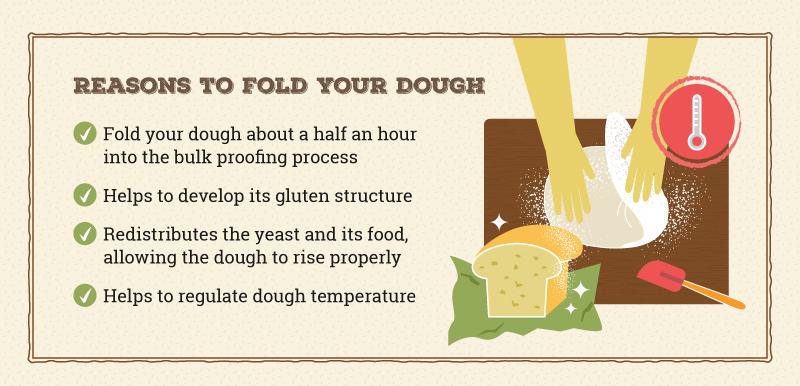
You will need to check your masterpiece periodically during this process. Once your dough feels soft and slightly springy, (think: memory foam), then that means it is ready to be divided and shaped into beautiful loaves perfect for baking. You will need to lightly flour your hands beforehand, as well as lightly flour your workspace. The next step is to cut your mass of dough in half. Keep in mind that your initial shape for your mass of dough during this process should be similar to your final shape you intend the dough to hold. So, if you plan on making square loaves, you'll want to make your mass of dough somewhat square in shape. You can call this process pre-shaping. Dont go overboard during this step, as you don't want to push all the gas out of the dough. After all, youve worked so hard to create it! In this next step, you can use a proofing basket, or a bowl and tea towel with an adequate amount of sprinkled flour. Once you shape your loaves, allow them to sit and rest for a while as you get your proofing baskets or bowls prepped and ready for action. Make sure whatever you choose to let them rise in is the proper size. Once you shape your loaf and place it in the bowl or basket, it should fill it to just a little over halfway. This will leave plenty of room for the dough to make its final rise in the proofing process. 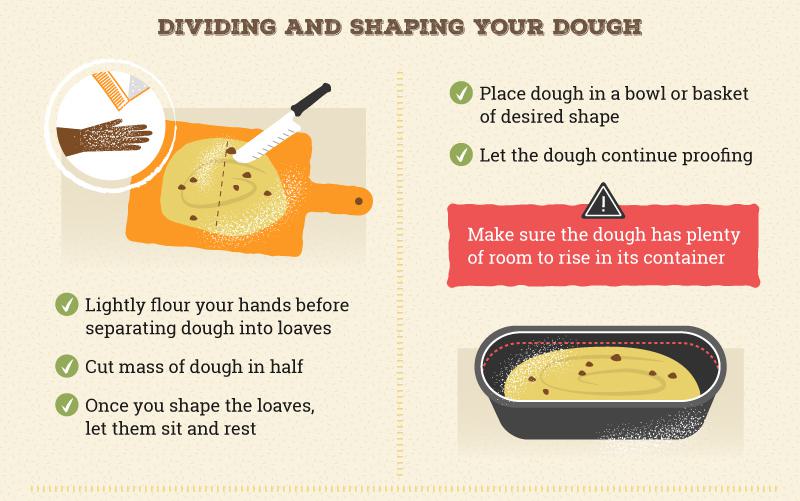
Soon your dough should be ready for its final shaping. Be careful during this process, as pulling too hard can cause the surface of the dough to tear and ruin the texture. Don't worry about any imperfections either, shaping is more about structure, not looks. Place your loaves once they are shaped into baskets, cover them with a towel, and then put them in your fridge for the final proof or final fermentation process. In this process, placing the loaves into the fridge helps to slow down the final rise. During this time, the dough should almost double in its size, and the slow rise process will give even more flavor to the bread. Slowing down this process by using the fridge also helps to make the dough easier to handle before baking it, which makes for a prettier bread loaf once you're done. As you can see, proofing bread is a vital step in the process of making bread and other baked goods that require yeast. When this final proofing process is completed and your dough has doubled in size, it will be ready to pop in the oven and bake. Get ready for the yummy, delicious smell of warm bread!
